What Does It Do?
PIWIPE ensures that personal data on devices is irreversibly destroyed and fully documented, helping organisations meet GDPR, KVKK, ISO 27001 and corporate data-disposal policy requirements. Erasure and certificates are aligned with DWP SS-036 Secure Sanitisation, NIST SP 800-88 and IEEE 2883-2022, with every operation classified as Clear or Purge.
| Category | Supported Devices | Methods |
|---|---|---|
| 📱 Phone / Tablet | Android, iPhone / iPad | Factory reset, cryptographic erase, NIST 800-88, IEEE 2883 |
| 💾 HDD / SSD | SATA, NVMe, SAS/SCSI, USB-connected drives | 18+ standards — NIST 800-88, DoD, IEEE 2883, HMG IS5, BSI/VSITR, Gutmann + NVMe/ATA hardware sanitize |
| 💿 Bootable USB | Any PC/laptop — no OS needed | WinPE-based edition wipes the system disk of a machine that won't boot to Windows |
Key Features
- 18+ Erasure Standards — NIST 800-88, DoD 5220.22-M, IEEE 2883, HMG IS5, BSI/VSITR, CESG, AFSSI, NAVSO, ITSG-06, Schneier and Gutmann, plus hardware NVMe/ATA sanitize
- SS-036 / NIST Classification — Every wipe is labelled Clear or Purge on the certificate, matching DWP SS-036 and NIST SP 800-88 requirements
- Hidden-Area Coverage — Detects and removes HPA/DCO and records reallocated (remapped) sectors so the full physical capacity is wiped
- Automatic PDF Certificate — Signed certificate with device details, method, timestamp and operator info generated after every wipe
- QR Code Verification — Customers scan the QR code on the certificate to instantly verify the wipe online
- ITAD Inventory Management — Track wiped assets, serials and grades for IT asset disposition and refurbishment workflows
- iPhone Parts Verification — Detects non-genuine or replaced screen, battery and camera; results recorded on the certificate
- Parts & Diagnostics — Automated testing of device components (screen, battery, camera, sensors, etc.)
- Bootable USB Edition — WinPE-based media wipes the internal disk of machines that cannot boot to Windows
- EV Code-Signed Installer — The application is signed with an Extended Validation certificate, so Windows SmartScreen trusts it immediately
- Digital Signature (PKCS#7 / PFX) — Cryptographic signatures on PDF certificates, verifiable in Adobe Reader without internet
- Credit-Based Licensing — Each wipe consumes 1 credit; pay only for what you use
- Cloud Sync & Web Panel — All reports stored in the cloud and accessible from the web panel
- Multilingual — Turkish and English interface
Who Uses It?
| User Type | Typical Use Case |
|---|---|
| Second-hand device resellers | Wipe purchased devices and provide certificates to buyers |
| IT service companies | Generate data erasure records for corporate device refresh projects |
| Corporate IT departments | GDPR/KVKK-compliant disposal records for decommissioned hardware |
| Data destruction firms | Certified workflow for bulk phone and disk wiping services |
Quick Start
If you're new, start with Chapter 01 — Setup & Login. If already installed, jump straight to Chapter 03 (phones) or Chapter 04 (disks). For certificate and QR verification details, see Chapter 05.
1.1 System Requirements
| Component | Minimum | Recommended |
|---|---|---|
| Operating System | Windows 10 64-bit (1903+) | Windows 11 |
| RAM | 4 GB | 8 GB+ |
| Disk Space | 500 MB free | 2 GB+ |
| USB | USB 2.0 | USB 3.0+ (faster wiping) |
| Internet | Required (Firebase) | — |
| Account privileges | Administrator | — |
| .NET / VC++ | Visual C++ 2015–2022 Redistributable | Installer handles automatically |
USB Driver Requirements
For Android devices, a manufacturer USB driver must be installed on the PC:
| Brand | Driver Package | Source |
|---|---|---|
| Samsung | Samsung USB Driver for Mobile Phones | samsung.com/global/galaxy/apps/kies |
| Xiaomi / MIUI | Xiaomi USB Driver | miui.com/getmiui |
| Huawei | HiSuite USB Driver | consumer.huawei.com/en/support |
| Other | Google USB Driver (generic) | developer.android.com/studio/run/win-usb |
For iPhone, iTunes or the Apple Devices app (Microsoft Store) must be installed — it includes the Apple USB driver.
1.2 Installation Steps
-
1
Run the installerDouble-click
PIWIPE_Setup_x.x.x.exe. The installer is signed with an Extended Validation (EV) code-signing certificate, so Windows SmartScreen recognises the publisher and does not warn. Confirm the UAC prompt to continue. -
2
Visual C++ RuntimeThe installer automatically installs VC++ 2015–2022 Redistributable. If it is already present, this step is silently skipped.
-
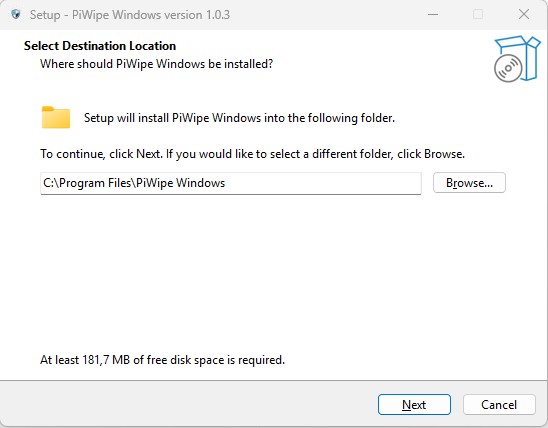
3
Choose installation directoryDefault:
C:\Program Files\PIWIPE Windows\. Changing this is not recommended. Click Next to continue. -
4
Complete and launchA desktop shortcut is created. On first launch, right-click → Run as administrator.
1.3 First Login and License Activation
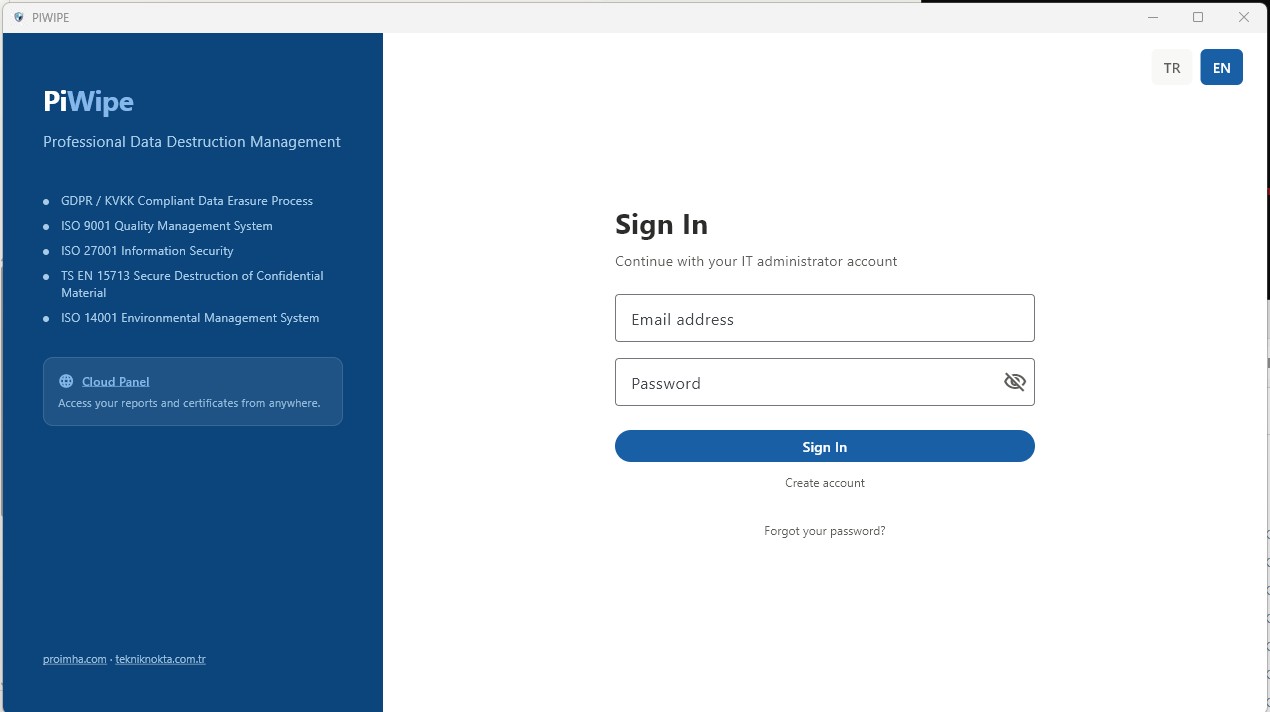
The login screen appears when the application starts. Sign in with your ProİMHA account (email + password).
-
1
Sign inEnter your email and password. If you don't have an account, one can be created at piwipe.com or via an invitation from your organization administrator.
-
2
License and credit checkLicense status and remaining credits are fetched automatically from Firebase. A warning displays if the license is expired or credits are insufficient.
-
3
Complete company informationOn first use, go to Settings → Company Info and fill in your details. This information appears in the header of all generated PDF reports.
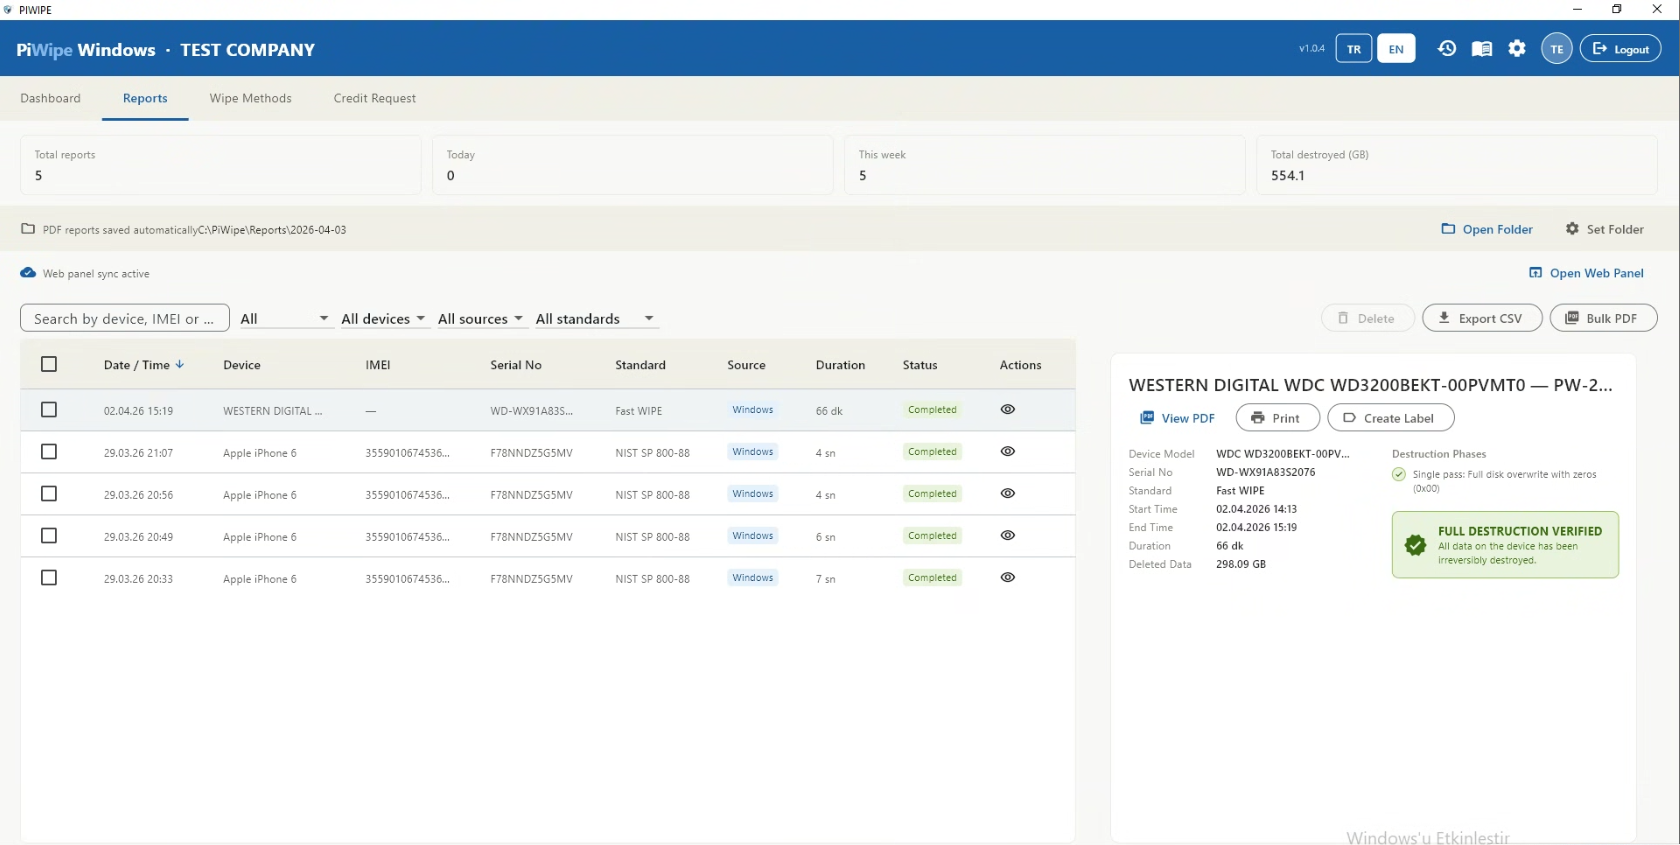
1.4 Interface Overview
2.1 What Are Credits?
PIWIPE deducts 1 credit after each successfully completed wipe. A credit check is performed before every operation — if the balance is zero, wiping cannot be started and a warning screen is shown.
Disk wipe → 1 credit
Failed operation (error, disconnection, cancelled) → 0 credits deducted
The mobile app and the Windows app share the same credit pool.
2.2 Credit Packages and Pricing
PIWIPE offers two models: monthly subscription plans (a set number of certificates each month) and one-time credit packages that never expire. Both include every feature and all 18+ standards; one license covers all devices at no extra charge.
Subscription Plans (monthly)
| Plan | Certificates / month | Price | Per Wipe | Highlights |
|---|---|---|---|---|
| Starter | 100 | $349 / mo | $3.49 | Technical support, cloud console |
| Business | 500 | $649 / mo | $1.30 | Priority support |
| Professional | 1,000 | $999 / mo | $1.00 | Dedicated account manager, multi-user |
| Enterprise | Unlimited | $1,499 / mo | — | Unlimited wipes, multi-user |
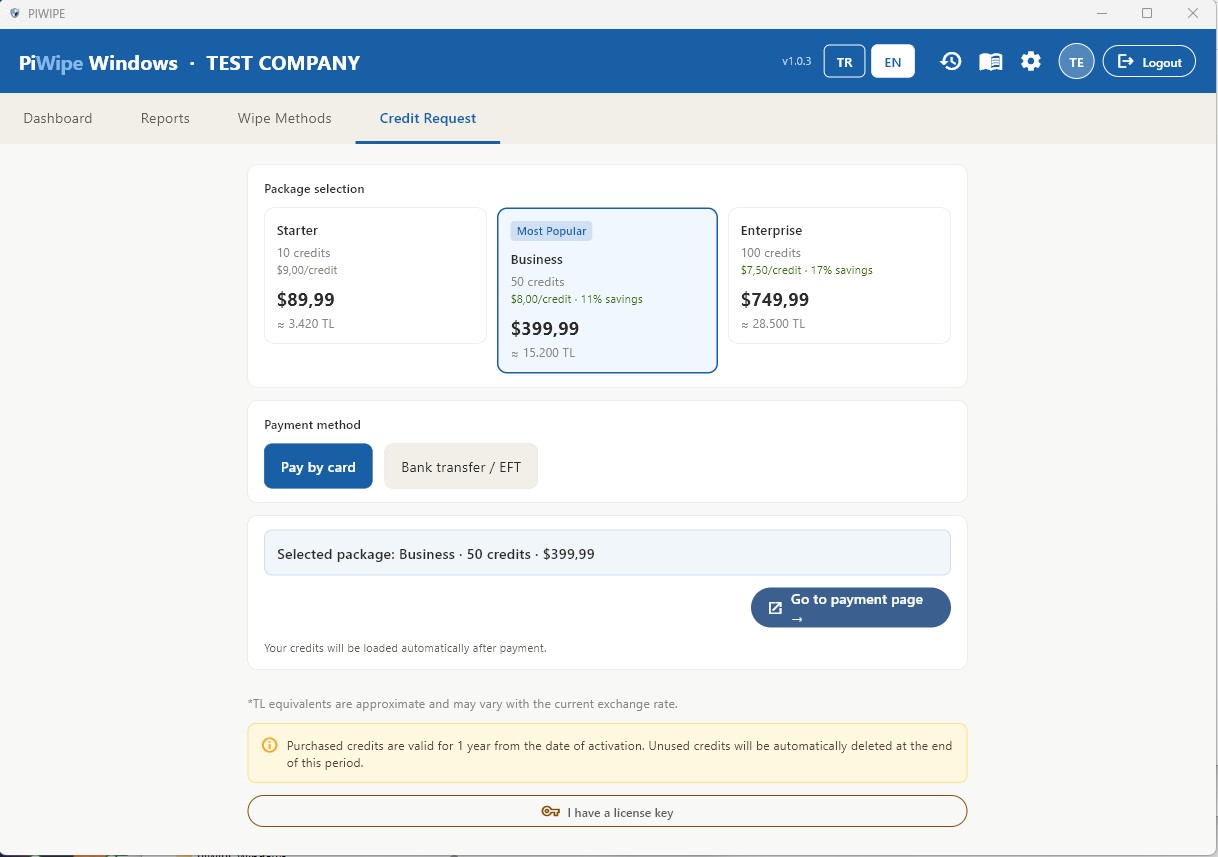
One-Time Credit Packages (never expire)
| Package | Credits | Price (USD) | Per Wipe | Saving |
|---|---|---|---|---|
| 10 Wipes | 10 | $95 | $9.50 | — |
| 50 Wipes | 50 | $399 | $7.98 | 16% cheaper |
| 100 Wipes | 100 | $599 | $5.99 | 37% cheaper |
| 250 Wipes | 250 | $1,249 | $4.99 | 47% cheaper |
| 500 Wipes | 500 | $1,999 | $3.99 | 58% cheaper |
Credits never expire. For volumes above 500 wipes or custom pricing, see piwipe.com/pricing or contact info@piwipe.com.
2.3 Payment Methods
Card Payment (PayTR)
-
1
Open the credit request screenClick the credit indicator in the top bar, or navigate to Reports → Add Credits.
-
2
Select a package and payClick Pay by Card. You are redirected to the PayTR secure payment page. Once payment is complete, credits are loaded to your account automatically.
Bank Transfer / Wire
Transfer the exact amount to the IBAN below and include your registered email address in the payment description. Credits are loaded manually after verification (during business hours, typically same day).
| Currency | IBAN | SWIFT / BIC |
|---|---|---|
| TRY | TR76 0015 7000 0000 0071 3821 17 | ENASTRISXXX |
| USD | TR04 0015 7000 0000 0098 2549 35 | ENASTRISXXX |
Account holder: Tekniknokta Bilişim Mühendislik Hizmetleri İnşaat Proje Çözümleri Ltd.Şti.
License Key Activation
If you have a license key provided by your organization administrator, enter it in Settings → License Key. Credits are added immediately upon successful activation.
2.4 Out of Credits — What To Do?
When credits reach 0, wiping is blocked and a warning screen is shown.
- Fastest method: Card payment via PayTR — credits appear within minutes.
- Wire transfer: Same business day if received during business hours, otherwise the next working day.
- Via organization admin: Contact the PIWIPE support team — info@piwipe.com.
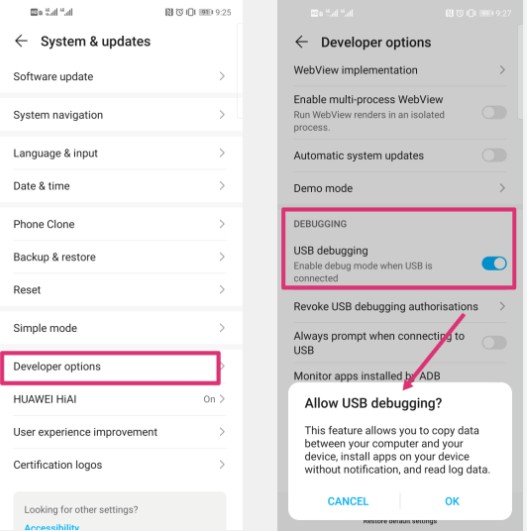
3.1 Connecting an Android Device
Enable USB Debugging
-
1
Open Developer OptionsGo to Settings → About Phone → Build Number and tap it 7 times in a row until you see "You are now a developer".
-
2
Enable USB DebuggingGo to Settings → Developer Options → USB Debugging and toggle it on.
-
3
Connect and trustConnect the device via USB. When the "Allow USB debugging / Trust this computer" dialog appears on the phone, tap Allow and check "Always allow from this computer".
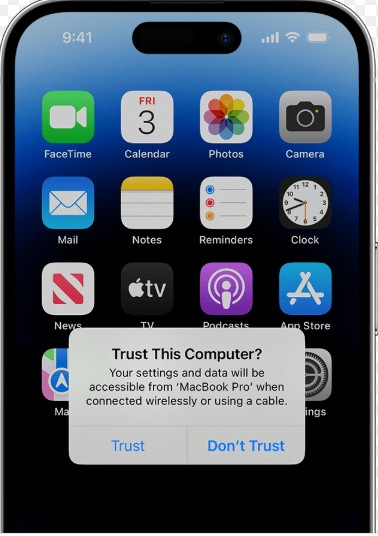
3.2 Connecting an iPhone
The Apple USB driver must be present on the system (installed with iTunes or the Apple Devices app).
-
1
Install iTunes or Apple DevicesInstall the Apple Devices app from the Microsoft Store (recommended), or download iTunes from apple.com/itunes. Either option installs the required Apple USB driver.
-
2
Unlock iPhone and connectUnlock the device with your passcode, then connect via USB. A "Trust This Computer" prompt appears on-screen — tap Trust and enter your passcode to confirm.
-
3
Pairing completePIWIPE creates a pairing file. Once done, the iPhone appears in the left panel. Keep the device unlocked throughout the session.
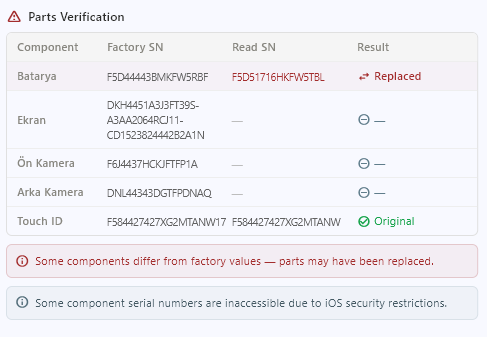
3.3 iPhone Parts Verification
When an iPhone is selected in the left panel, a Parts Verification table appears automatically in the right panel. The original factory-recorded serial numbers stored on the device are compared against the serial numbers currently read from each component — revealing which parts may have been replaced.
Checked Components
| Component | Result | Meaning |
|---|---|---|
| Battery | Original Possibly Replaced — | Factory and current serial numbers match Factory and current serial numbers differ — component may have been replaced Factory data not found on device |
| Screen | ||
| Front Camera | ||
| Rear Camera | ||
| Touch ID / Face ID |
Reading the Results Table
The parts verification table shows three columns for each component:
| Column | Description |
|---|---|
| Factory SN | The original serial number written to SysCfg memory at the time of manufacture. |
| Current SN | The serial number currently reported by the component over the device's internal bus. |
| Result | Original when they match, Possibly Replaced when they differ, — when factory data is absent. |
What Does "Possibly Replaced" Mean?
When a component shows Possibly Replaced, it indicates that the component may have been changed since the device left the factory. Common reasons include:
- Repair performed by an unauthorised (non-Apple) service provider
- Component swapped by the user
- Repair at an Apple Authorised Service Centre (in some cases the factory record may not be updated)
In second-hand device buyback workflows, this result can serve as a signal to inspect the device more closely and apply a price adjustment accordingly.
Certificate Integration
The detected status of each component (Original / Possibly Replaced / Unknown) is automatically included in the PDF certificate. This is especially valuable for second-hand device buyback companies: the component history can be documented at the time of purchase and delivered to the customer as a legally valid, auditable report.
3.4 Wipe Method Comparison
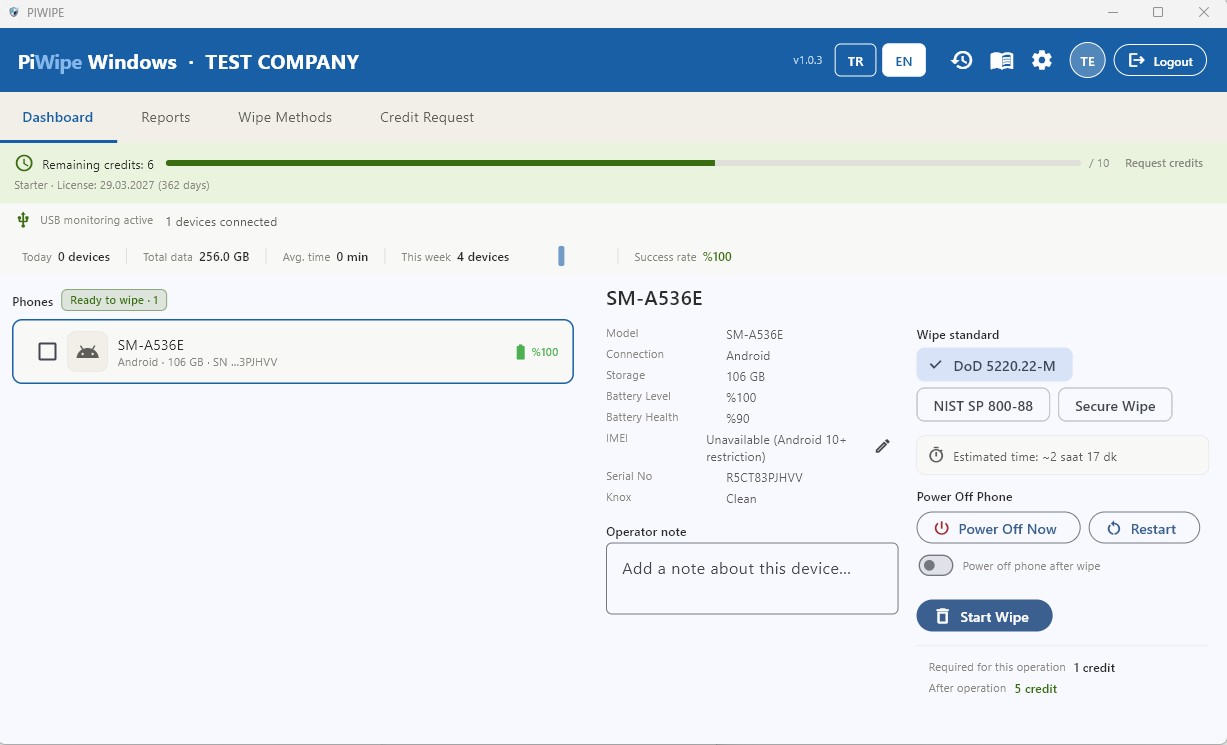
After selecting a device in the left panel, choose a wipe standard from the right panel before starting.
| Method | Passes | Security | Speed | Android | iPhone |
|---|---|---|---|---|---|
| Fast WIPE | 1 (zero fill) | Basic | Very Fast | ✓ | ✗ |
| NIST SP 800-88 | 1 + verify | High | Fast | ✓ | ✓ |
| DoD 5220.22-M | 3 passes | Very High | Medium | ✓ | ✓ |
| Secure Wipe (IEEE 2883) | Crypto erase + verify | Maximum | Fast | ✓ | ✓ |
The full 18+ standard set (HMG, BSI, VSITR, Schneier, Gutmann and others) applies to disk wiping — see Chapter 04 → 4.3 Disk Wipe Standards. Phones are erased through the platform's native cryptographic-erase and factory-reset paths, for which the methods above are the appropriate choices.
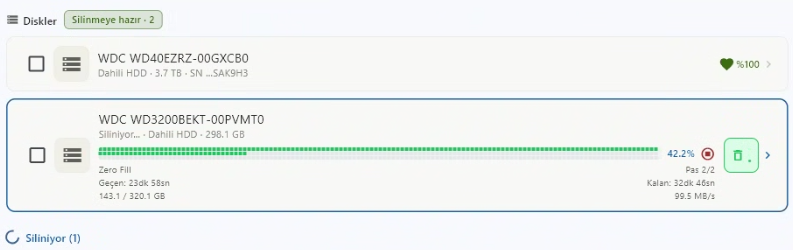
3.5 Progress Tracking and Certificate

Once the wipe starts, the phases appear in the right panel in real time:
| Phase | Description |
|---|---|
| Preparation | Device information gathered (IMEI, model, serial number, battery status). |
| Wiping | Data erasure running per the selected standard. Progress % shown. |
| Verification | Written data read back and verified (NIST / DoD / Secure Wipe only). |
| Shutdown | Android device is safely powered off (ADB shutdown command). |
| Certificate | PDF certificate generated and saved automatically. |
PW-YYYY-XXXXX format (e.g. PW-2026-00142). This ID appears on the QR code and the PDF report, and can be used for independent verification at cloud.piwipe.com/verify/<ID>.3.6 Estimated Wipe Times
Times vary by device type, storage capacity and selected standard. The values below are approximate estimates for typical conditions.
| Device | Storage | NIST SP 800-88 | DoD 5220.22-M |
|---|---|---|---|
| iPhone Cryptographic erase |
All models | ~2 minutes — independent of storage size | |
| Android ADB + factory reset |
32 GB | ~15 min | ~40 min |
| 64 GB | ~29 min | ~1 hr 20 min | |
| 128 GB | ~56 min | ~2 hr 40 min | |
| 256 GB | ~1 hr 50 min | ~5 hr 20 min | |
4.1 Connecting and Detecting Disks
PIWIPE uses WMI (Windows Management Instrumentation) to scan for disks. Disks already connected when the app starts are detected immediately; newly plugged-in disks appear in the left panel within a few seconds.
Supported Disk Interfaces
| Interface / Type | Coverage | Notes |
|---|---|---|
| SATA | HDD and SSD | Most common internal interface; all wipe standards supported |
| PATA / IDE | Legacy HDDs and optical drives | Supported on older systems; SMART support may be limited |
| NVMe | M.2, PCIe SSD | NVMe Sanitize command supported; fastest wipe method |
| M.2 | SATA or NVMe protocol | Form factor only — processed as SATA or NVMe based on protocol |
| PCIe / PCI | Add-in card SSD | PCIe SSDs accessed via NVMe are fully supported |
| SAS / SCSI | Enterprise HDD and SSD | Includes SAS-SSD; typically found in server environments |
| SED Self-Encrypting Drive | AES hardware-encrypted disks | Crypto Erase supported — encryption key is destroyed, rendering all data permanently inaccessible |
| USB | Flash drives, external HDD/SSD | Auto-detected on plug-in; USB 3.0+ recommended |
| Fusion Drive | Apple HDD + SSD hybrid | HDD and SSD components appear as separate drives and can be wiped individually |
| Memory Card | SD, microSD etc. | Detected via card reader or USB adapter as a standard disk |
Detection by Connection Method
| Disk Type | Connection | Notes |
|---|---|---|
| Internal SATA / NVMe / SAS | Auto-detected on startup | System disk marked in red — cannot be wiped |
| External HDD / SSD | USB adapter (detected on plug-in) | Use USB 3.0 for faster speeds |
| USB Flash Drive | Direct USB | Detected within seconds of connection |
| Memory Card | Card reader or USB adapter | Appears as a standard removable disk |
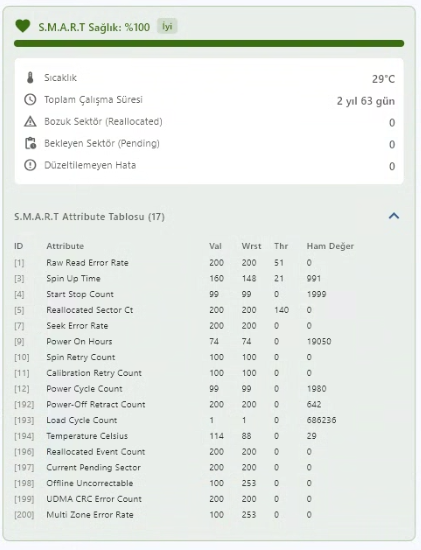
4.2 Reading and Interpreting SMART Data
When a disk is selected, SMART (Self-Monitoring, Analysis and Reporting Technology) data is displayed in the right panel. These values reflect the disk's health and usage history.
| Parameter | Description | Interpretation |
|---|---|---|
| Health % | Overall health score (0–100) | 70%+ Good 30–70% Caution <30% Critical |
| Temperature | Current disk temperature (°C) | Normal: 30–55°C. Above 60°C is an overheating risk. |
| Power-On Hours | Total cumulative uptime (hours) | 20,000+ hours warrants attention for HDDs. |
| Reallocated Sectors | Bad sectors remapped to spare areas | 0 is ideal. Any value >0 may indicate physical degradation. |
| Wear Level (SSD) | NAND flash cell lifetime consumed (%) | Only shown for SSDs. 0% = completely worn out. |
4.3 Disk Wipe Standards
PIWIPE supports 18+ internationally recognised erasure standards, so you can match the exact algorithm named in a tender, ITAD contract or corporate security policy. Every standard maps to a DWP SS-036 / NIST SP 800-88 classification — Clear (single-pass overwrite) or Purge (multi-pass overwrite or hardware sanitize) — which is printed on the certificate. The four core standards are shown by default; the rest appear under the “Advanced standards” toggle in the disk detail panel.
Core Standards — shown by default
| Standard | Passes | Method | Verify | Class | Recommended Use |
|---|---|---|---|---|---|
| Fast WIPE | 1 | Zero fill (0x00) | No | Clear | Rapid cleanup of non-sensitive data |
| NIST SP 800-88 | 1 | Zero fill + read-verify | Yes | Clear | Corporate default; required when a destruction certificate is needed |
| DoD 5220.22-M | 3 | 0x00 → 0xFF → Random + verify | Yes | Purge | Government, military and financial-sector requirements |
| Secure Wipe (IEEE 2883) | 1 / HW | Hardware Sanitize where supported, else verified overwrite | Yes | Purge | Modern standard for SSD/NVMe; the recommended maximum-assurance option |
Hardware Sanitize
| Standard | Passes | Method | Verify | Class | Recommended Use |
|---|---|---|---|---|---|
| NVMe Sanitize / ATA Secure Erase | — | Controller-level Sanitize / Block Erase / Crypto Erase | Internal | Purge | Most reliable method for NVMe/SATA SSDs — reaches over-provisioned and wear-levelled cells |
Advanced Standards — enable via the “Advanced standards” toggle
| Standard | Region / Body | Passes | Class |
|---|---|---|---|
| HMG IS5 Baseline | UK CESG | 1 (zero + verify) | Clear |
| HMG IS5 Enhanced | UK CESG | 3 (0x00, 0xFF, random + verify) | Purge |
| CESG CPA Higher | UK NCSC | 3 + per-pass verify | Purge |
| BSI-GS | Germany BSI | 1 (aperiodic random) | Clear |
| BSI-GSE | Germany BSI | 2 (aperiodic random) | Purge |
| BSI-2011-VS | Germany BSI | 4 | Purge |
| VSITR | Germany BSI | 7 (0x00/0xFF ×3 + 0xAA) | Purge |
| AFSSI-5020 | US Air Force | 3 (0x00, 0xFF, random) | Purge |
| NAVSO P-5239-26 | US Navy | 3 (pattern, complement, random) | Purge |
| CSEC ITSG-06 | Canada CSEC | 3 (0xFF, 0x00, random) | Purge |
| Schneier | Bruce Schneier | 7 (0xFF, 0x00, 5× random) | Purge |
| Gutmann | Peter Gutmann | 35 (patterns + random) | Purge |
What Is NVMe Sanitize?
On SSDs supporting the NVMe protocol, PIWIPE issues a hardware-level Sanitize command to the disk controller. This erases all NAND cells — including reserved areas, wear-levelling cells and over-provisioned space inaccessible to software. It is more thorough than software-based methods and typically faster. If the disk does not support the Sanitize command, PIWIPE automatically falls back to NIST SP 800-88 and notes this in the certificate.
Detection and Erasure of Hidden Disk Areas
Beyond the standard wipe pass, PIWIPE detects and clears three hidden areas that could otherwise prevent full disk coverage:
| Area | Description | Risk |
|---|---|---|
| HPA Host Protected Area |
A reserved region hidden from the operating system by the disk manufacturer or BIOS. Recovery partitions, factory tools, or malware can be stored here and survive a standard wipe. | Medium |
| DCO Device Configuration Overlay |
A hardware layer used to mask the disk's true capacity and supported commands. When active, the disk appears smaller than it really is — hidden sectors can be left untouched by a wipe. | High |
| Remapped Sectors Reallocated Sectors |
The disk controller replaces failing sectors with spare cells. Standard write commands cannot reach the retired sectors, leaving their data intact. | Medium |
Before wiping begins, PIWIPE queries the disk via ATA commands to detect HPA and DCO; if found, they are removed so the wipe covers the disk's true capacity. For remapped sectors, the Reallocated Sector Count value is read from SMART data and recorded in the certificate.
4.4 Estimated Wipe Times
The times below are calculated by the application's estimation engine. Actual duration may vary depending on disk health, system load and hardware.
| Disk Type | Capacity | Fast Wipe | NIST SP 800-88 | DoD 5220.22-M |
|---|---|---|---|---|
| NVMe SSD ~500 MB/s · ~30 GB/min |
512 GB | ~11 min | ~21 min | ~55 min |
| 1 TB | ~21 min | ~40 min | ~1 hr 50 min | |
| SATA SSD ~320 MB/s · ~19 GB/min |
512 GB | ~17 min | ~32 min | ~1 hr 25 min |
| 1 TB | ~33 min | ~62 min | ~2 hr 50 min | |
| Internal HDD ~95 MB/s · ~6 GB/min |
500 GB | ~54 min | ~1 hr 43 min | ~5 hr |
| 1 TB | ~1 hr 48 min | ~3 hr 26 min | ~10 hr 40 min | |
| 2 TB | ~3 hr 36 min | ~6 hr 52 min | ~21 hr | |
| External HDD (USB) ~60 MB/s · ~3.6 GB/min |
1 TB | ~3 hr | ~6 hr 10 min | ~18 hr 30 min |
| 2 TB | ~6 hr | ~12 hr 20 min | ~37 hr | |
| USB Flash Drive ~18 MB/s · ~1 GB/min |
32 GB | ~32 min | ~42 min | ~1 hr 45 min |
| 64 GB | ~62 min | ~83 min | ~3 hr 25 min | |
| 128 GB | ~2 hr 4 min | ~2 hr 45 min | ~6 hr 50 min |
4.5 Bootable USB Edition (WinPE)
Some machines cannot be wiped from within Windows — the disk you need to erase is the one Windows is running from, or the computer no longer boots. For these cases PIWIPE offers a bootable USB edition built on WinPE that runs entirely from the USB stick, independent of the machine's installed operating system.
When to Use It
- Wiping the system/OS disk of a laptop or desktop before resale or return
- Machines that will not boot into Windows (corrupt OS, no OS installed)
- Bulk decommissioning where booting each machine into its own OS is impractical
How It Works
-
1
Create the USB mediaWrite the PIWIPE bootable image to a USB stick (8 GB+). The image contains WinPE and the PIWIPE wipe engine.
-
2
Boot the target machine from USBEnter the boot menu (usually
F12/F9/Esc) and select the USB device. On UEFI systems, Secure Boot may need to be temporarily disabled. -
3
Select the disk and standardPIWIPE lists all detected internal disks. Choose the disk and one of the supported erasure standards (see 4.3). HPA/DCO detection and hardware sanitize work the same as in the desktop app.
-
4
Wipe and certifyThe wipe runs from WinPE and produces the same certificate record. The certificate is synced to the cloud once the machine is back online, or exported locally.
5.1 Automatic Certificate Generation
No manual steps are required. When a wipe completes successfully, PIWIPE:
- Writes a certificate record to Firestore (
wipe_reports/{certId}for phones,wipe_sessions/{certId}for disks). - Generates a PDF report and saves it to
Documents\PIWIPE\DD.MM.YYYY\. - Uploads a backup copy to Firebase Storage.
- Deducts 1 credit from the account.
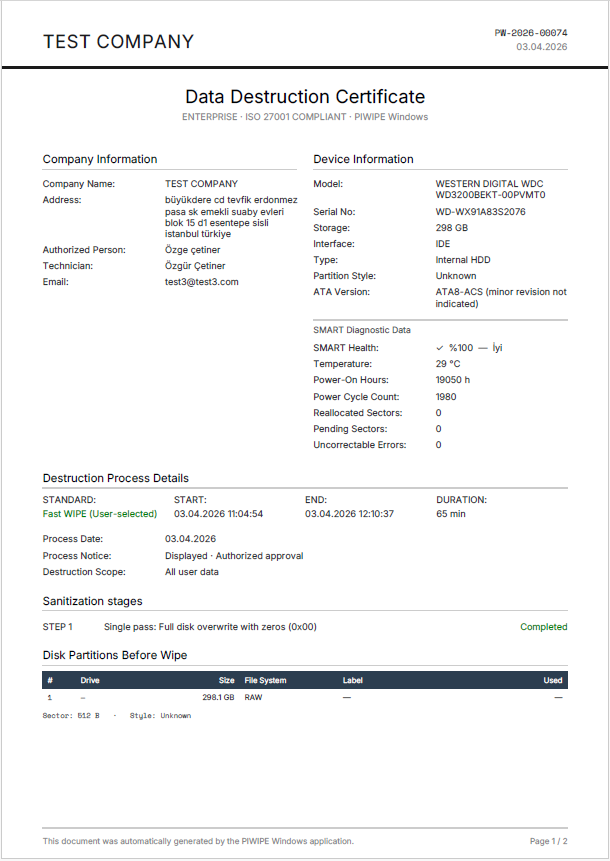
PDF Report Structure
| Page | Content |
|---|---|
| Page 1 | Company name and logo · Device info (model, serial no, IMEI) · Wipe standard · SS-036 / NIST classification (Clear or Purge) · Start / end date and time · Wipe phase statuses · HPA/DCO & reallocated-sector status (disks) · SMART data (disks only) · SHA-256 integrity hash · QR verification code · Certificate ID |
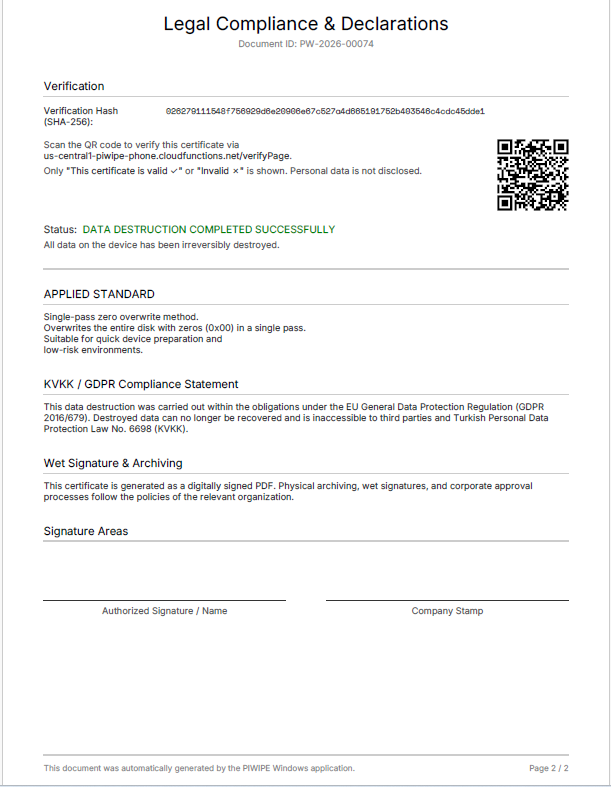
| Page 2 | Legal liability statement · Digital signature block (when enabled) · Operator and authorized person name |
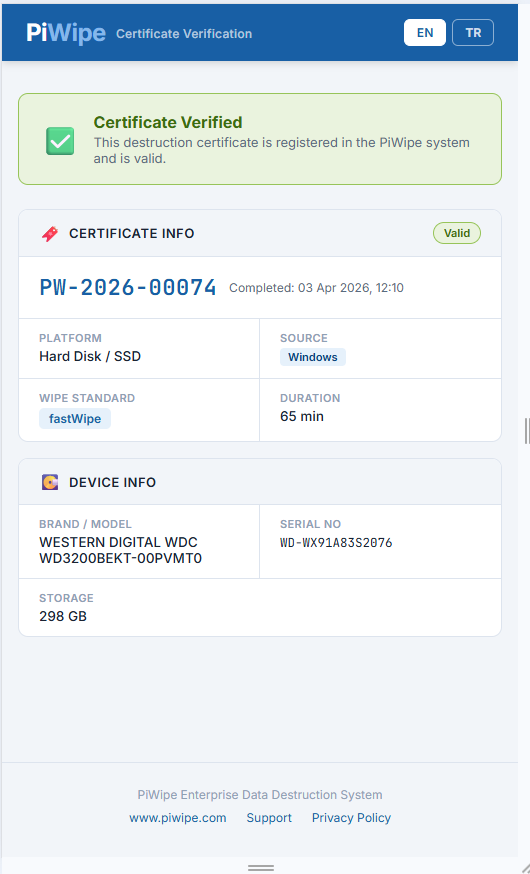
5.2 QR Code Verification
Each PDF has a QR code in the bottom-right corner. Scanning it opens:
https://cloud.piwipe.com/verify/PW-2026-XXXXX
This verification page requires no login and can be shared with customers. It retrieves certificate data directly from Firestore and displays:
- Device type (📱 Phone or 💿 Disk), brand and model
- Wipe standard and completion date/time
- Company name, operator and authorized person
- Certificate ID and validity status
- Certificate validity period (1 year from the date of issue)
5.3 SHA-256 Integrity Hash
An integrity hash is computed for each certificate using the following inputs and printed on the PDF:
SHA-256( certId + IMEI/SerialNumber + endTime )
This hash can be used to independently verify that the report has not been tampered with. Any modification to the document will produce a different hash.
5.4 Digital Signature (PKCS#7 / PFX)
When Settings → Digital Signature is enabled, a PKCS#7 detached signature is embedded in the PDF.
- Adobe Acrobat Reader displays a "Signed and all signatures are valid" banner.
- If no custom PFX is configured, the auto-generated default certificate is used.
- For corporate use, load your own PFX file via Settings → Custom PFX (see Chapter 6).
SHA-256 Hash vs. Digital Signature — What's the Difference?
PIWIPE certificates use two separate security layers. They are different technologies and complement each other.
SHA-256 Verification Hash (Server-Side)
For each certificate, when erasure completes, critical data (device info, standard, start/end time, result) is combined and converted into a single hash string using the SHA-256 algorithm. This hash is both written into the PDF and saved to the certificates collection in Firestore.
- How verification works: When the QR code or verify link on the certificate is opened, the system compares the hash in the PDF with the hash in Firestore. If they match, the certificate is authentic.
- What it proves: That the certificate data (date, device, result) has not been altered since it was created. If someone edits the PDF and changes a date or result, the hash won't match.
- Limitation: Requires an internet connection — a query is made to the server.
- Analogy: The reference number on a bank statement — authenticity is verified by comparing it against bank records.
PKCS#7 Digital Signature (File-Side)
The entire PDF file is cryptographically signed using the private key from the PFX certificate. This signature is embedded inside the PDF's internal structure and cannot be separated from the file.
- How verification works: Adobe Acrobat, Foxit, or any standard PDF reader automatically verifies the signature when the file is opened. If the signature is valid, a green banner is shown at the top.
- What it proves: That not even a single byte of the PDF file has been changed since it was signed. The file itself is portable proof — it can be verified without connecting to any server.
- Limitation: If the certificate is self-signed, Adobe may show "signature valid but not trusted." This warning disappears with a CA-issued certificate.
- Analogy: A notary seal — the seal is on the document itself; authenticity can be determined without visiting the notary.
Side-by-Side Comparison
| SHA-256 Verification Hash | PKCS#7 Digital Signature | |
|---|---|---|
| Where stored | Inside PDF + Firestore server | Inside the PDF file only |
| Verification method | Web browser (verify page or QR code) | PDF reader (Adobe Acrobat, Foxit) |
| Internet required | Yes | No — the file is self-contained |
| What it protects | Certificate data (date, device, result) | The entire PDF file |
| Who can verify | Anyone (via QR code / link) | Anyone with a PDF reader |
5.5 Bulk Report Export
In the Reports screen, select multiple certificates with checkboxes for bulk operations:
| Action | Description |
|---|---|
| Bulk PDF copy | PDFs of all selected certificates are copied to a local folder you choose. |
| ZIP export | All selected PDFs are packed into a single .zip archive. |
| Date filter | Narrow the list by selecting a start and end date range. |
| Type filter | Show only phone certificates, only disk certificates, or all. |
| Standard filter | Filter by wipe method (NIST / DoD / Secure Wipe / etc.). |
6.1 Company Information
This information appears in the header section of PDF reports. Filling it in accurately is important for legal validity and customer-facing documentation.
| Field | Description | Required |
|---|---|---|
| Company Name | Displayed prominently at the top of the PDF | ✓ |
| Authorized Person | Person legally responsible for the destruction process | ✓ |
| Technician Name | Person who physically performed the operation | ✓ |
| Tax Number | For compliance and corporate invoicing | — |
| Phone | Contact info shown in the report footer | — |
| Website | Shown in the lower section of the report | — |
Company Logo
-
1
Go to Settings → Company Info → LogoClick the folder icon to open the file picker.
-
2
Select a PNG or JPG fileRecommended size: 300 × 100 px, transparent background (PNG). Oversized files are scaled automatically.
-
3
SaveAll PDFs generated from this point on will include the logo in the top-left corner of Page 1.
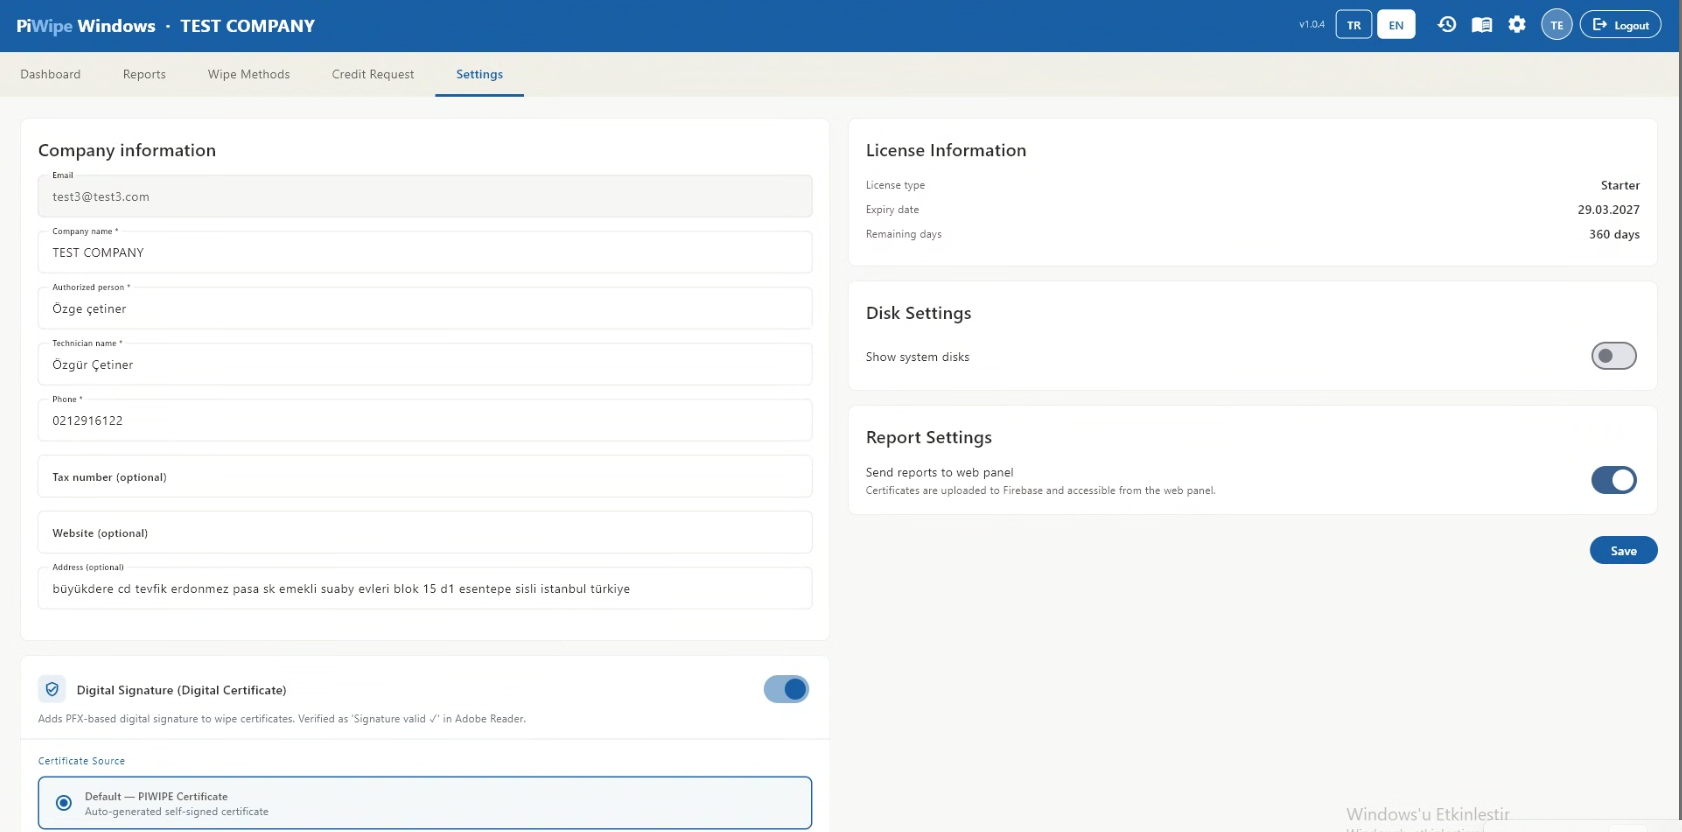
6.2 Digital Signature — Custom PFX Setup
Enabling the Default Signature
Toggle Digital Signature on. The ProİMHA default certificate is used automatically — no additional configuration is needed.
Loading a Custom PFX File
-
1
Enable "Use Custom PFX"In the Digital Signature card in Settings, enable the Use Custom PFX option.
-
2
Select the PFX fileClick the folder icon and select your
.pfxor.p12file. -
3
Enter the PFX passwordType the password in the designated field. It is stored locally in encrypted form and never transmitted.
-
4
Save and verifyClick Save. Perform a test wipe and open the PDF in Adobe Acrobat Reader — a green signature banner confirms the certificate is working correctly.
6.3 Cloud Report Sending
Send Reports to Firebase toggle:
| State | Behaviour |
|---|---|
| On (default) | Certificate data (PDF + Firestore record) is sent to Firebase. QR verification works. Accessible from the web panel. |
| Off | PDF is saved to local disk only. QR verification returns empty. Use in offline or network-restricted environments only. |
6.4 System Disk Visibility
Show system disks toggle:
| State | Behaviour |
|---|---|
| Off (default) | The Windows system disk is hidden from the left panel — the list stays clean and uncluttered. |
| On | The system disk is listed with a red indicator. It can be viewed for informational purposes (SMART data, size) but wiping remains permanently disabled. |
7.1 Logging In to the Web Panel
https://cloud.piwipe.com
Sign in with the same ProİMHA account used in the Windows application. All certificates are visible because both platforms share the same Firebase project.

7.2 Certificate Search and Filtering
| Filter | Description |
|---|---|
| Device name / model | Search by device name or model identifier |
| IMEI / Serial no. | Exact lookup using 15-digit IMEI or disk serial number |
| Date range | Select start and end dates to view a specific period |
| Wipe standard | Filter by any of the 18+ standards (NIST / DoD / IEEE 2883 / Fast WIPE / HMG / BSI / …) |
| Device type | Show phones only, disks only, or all |
| Certificate ID | Direct lookup using PW-2026-XXXXX format |
7.3 Customer / Corporate Verification
Internal Use (Login Required)
A logged-in user can view all certificates generated by their organization — search, list, view details, and download PDFs.
Public Customer Verification (No Login Required)
Scan the QR code on the delivered PDF or navigate directly to:
https://cloud.piwipe.com/verify/PW-2026-XXXXX
The page displays: device type, brand/model, wipe date, standard, company name, operator, and certificate ID. No account creation is required. Share both the PDF and this URL with your customer.
7.4 Admin Operations
For admin operations such as creating users, assigning credits, managing licenses and accessing organization-wide reports, please contact the PIWIPE support team.
| Action | Contact |
|---|---|
| Create a new user | info@piwipe.com |
| Assign credits to a user | info@piwipe.com |
| Manage licenses | info@piwipe.com |
7.5 ITAD Inventory & Asset Tracking
For IT Asset Disposition (ITAD) and refurbishment operations, PIWIPE goes beyond a single certificate and maintains a searchable inventory of every processed asset. Because each wipe writes a record with the device identity, method and result, the certificate list doubles as an audit-ready asset register.
| Field | Purpose |
|---|---|
| Asset identity | Serial number / IMEI, brand and model captured automatically at wipe time |
| Erasure record | Standard applied, SS-036 Clear/Purge classification, start/end time and result |
| Device grade | Screen, battery and functional-test outcomes recorded for resale grading |
| Chain of custody | Operator and company on every record; certificate ID links back to the signed PDF |
| Export | Filter by date, type or standard and export the matching set as a batch (PDF/ZIP) for the client or auditor |
8.1 ADB / Android Issues
- USB Debugging enabled? — Settings → Developer Options → USB Debugging must be on.
- Trust dialog confirmed? — A "Trust this computer / Allow USB debugging" dialog must have been accepted on the phone.
- Try a different USB cable — Charging-only cables do not carry data. Use the original or a certified cable.
- Skip USB hubs — Plug directly into a motherboard USB port rather than a hub.
- Install manufacturer driver — Samsung: Samsung USB Driver · Xiaomi: MIUI USB Driver · Huawei: HiSuite. See Chapter 1 — System Requirements.
- Run as administrator — ADB communication requires elevated privileges.
- Check Device Manager: Win + X → Device Manager → look for yellow exclamation marks under Other Devices.
8.2 iPhone / iOS Issues
- Unlock the iPhone with your passcode before plugging in the USB cable.
- Ensure iTunes or Apple Devices (Microsoft Store) is installed.
- If you previously tapped "Don't Trust" or removed this PC from trusted devices: Settings → General → VPN & Device Management → Reset Location & Privacy, then reconnect.
- Try a different Lightning or USB-C cable — the cable may be faulty.
%TEMP%\piwipe_idevice. If the issue persists, delete this folder and restart the application.
8.3 Disk Detection Issues
- Check Windows Disk Management — Win + R →
diskmgmt.msc. If the disk doesn't appear there either, the issue is hardware or adapter-level. - Try a different USB adapter or port — prefer USB 3.0 ports; some adapters are unreliable.
- Run as administrator — WMI disk queries require elevated privileges.
- Settings → Show system disks — if off (default), the Windows drive is intentionally hidden. This is expected behaviour.
- Unplug and replug the disk. Disks connected while the app is running are detected within a few seconds.
8.4 Certificate and Report Issues
- Check internet connection — Firebase must be reachable. Once restored, re-upload from the Reports screen.
- Settings → Send Reports to Firebase — is this toggle on?
- Check the local folder:
Documents\PIWIPE\. If the PDF is there, only cloud upload failed — use the upload button in the Reports screen. - Run as administrator — some security software may block Firebase connections from non-admin processes.
8.5 Installer and Startup Errors
This only affects developers building the installer — not end users. Inno Setup is installed but not on the system PATH. Use the full path:
"C:\Program Files (x86)\Inno Setup 6\iscc.exe" installer\piwipe_setup.iss
Or download Inno Setup from jrsoftware.org/isinfo.php.
- Uninstall the existing runtime: Win + R →
appwiz.cpl→ find "Microsoft Visual C++ 2015–2022 Redistributable" → Uninstall. - Re-run the PIWIPE installer — VC++ is reinstalled automatically.
- If still failing, manually download the VC++ x64 Redistributable from microsoft.com.
requireAdministrator. To avoid the extra right-click step: Desktop shortcut → Properties → Shortcut → Advanced → check "Run as administrator". You will still see a UAC prompt, but it appears immediately on double-click.
PIWIPE_Setup_x.x.x.exe) and run it directly. There is no need to uninstall the old version — the new version installs over it. Settings, certificate history and license data are all preserved.
8.6 Technical Support
If your issue is not resolved by the steps above, contact support with the error message, your Windows version, and the PIWIPE version number (visible in the title bar).
| Channel | Details |
|---|---|
| info@piwipe.com | |
| Web | piwipe.com |
9.1 What Does the Activity Log Record?
The Activity Log stores timestamped entries for every important event in the application. The following event types are recorded automatically:
| Event Type | When Triggered |
|---|---|
| 🟢 Login | User successfully signs in to the application |
| ⚫ Logout | User signs out of the session |
| 🔵 Wipe Started | A disk or phone wipe operation is initiated |
| 🟢 Wipe Complete | Wipe operation finishes successfully |
| 🔴 Wipe Failed | An error occurs during the wipe |
| 🟠 Wipe Cancelled | User cancels a wipe in progress |
| 🟣 Settings Change | Company profile updated or report folder changed |
9.2 How to Open the Activity Log
Click the 📋 history icon in the top bar (to the left of the language buttons). A full-screen log viewer opens.
From the log screen you can:
- Search: Filter instantly by device name, user, serial number or IP address.
- Type filter: Show only specific event types (e.g. only "Wipe Complete").
- Refresh: Reload the latest entries without closing the screen.
- Copy file path: Copy the full log file path to the clipboard.
- Clear log: Permanently delete all entries (confirmation required).
9.3 Columns and Fields
| Column | Description |
|---|---|
| Time | Date and time of the event (DD.MM.YYYY HH:MM:SS) |
| Type | Event category — shown with a coloured icon |
| User | Email address of the user who performed the action |
| IP Address | Local network IPv4 address of the machine at the time of logging |
| Serial No | Serial number of the relevant disk or phone (IMEI fallback for phones) |
| Description | Short description of the event (e.g. "Samsung SM-G991B wipe complete") |
| Detail | Additional info: wipe standard, capacity, changed setting value |
9.4 Log File Location
Log entries are stored in a local file. Default location:
C:\PiWipe\Logs\activity_log.jsonlThe file uses JSONL (JSON Lines) format — each line is an independent JSON object. It can be read with any text editor, Excel (Data → Get Data → From JSON), or log analysis tools (e.g. jq, Notepad++).
If you have changed the report folder, the log is created under the same parent directory:
<Report Folder Parent>\Logs\activity_log.jsonl